Uploading More Than One Vector File Into the Same Solidworks Part
In the world of tech support, one of the more than mutual questions we receive is "How do I work with a visitor logo in SOLIDWORKS?" This question comes in various forms, including "I want to testify a company logo on a part, and I desire information technology to brandish in the drawing view" or "I want to include our company logo in a cartoon title cake. "In this blog we volition take a await at some challenges users face when working with company logos, and some best practices to ensure that you get consistent and reliable results.
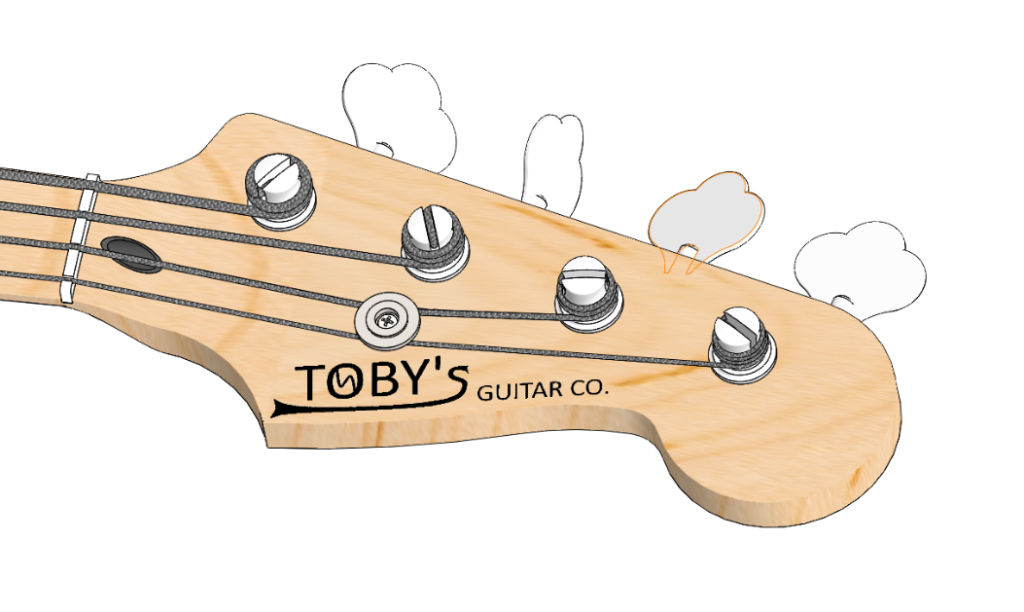 The headstock of a bass guitar, with a company logo.
Our Fictional Visitor Logo
In this instance, we are going to work with a fictional guitar company, "Toby's Guitar Co." Our goal will exist to use this visitor logo on our title blocks in drawings. We also want to create a cutting extrude of this logo to use on the chrome neckplate of the guitar.
Getting Started with a Logo Image
To get started nosotros should showtime attempt to get the highest quality paradigm of the logo we tin find. This might be from the company website, marketing material they provide or from a photograph of the logo.
 A high quality image of the company logo.
The ideal scenario happens when the company has, and is willing to share, a DXF or DWG of its company logo. When this happens, it saves u.s. quite a few steps. More ofttimes than non, companies will but share an prototype with you. But it'southward always all-time to ask the company if they take a DWG, DXF or vector epitome of its company logo before recreating it.
Nosotros were able to reach out to the marketing team of "Toby's Guitar Co." and secure a high-quality epitome of the logo, every bit shown in the image above. Now we want to utilise this prototype in a few areas in SOLIDWORKS.
Some Things Might NOT Work
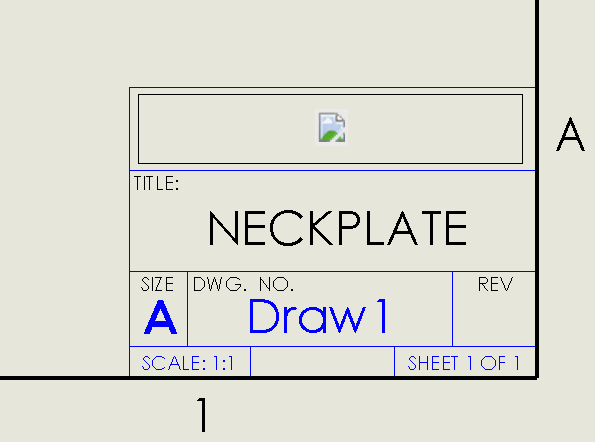
Let's start by addressing some techniques that might not piece of work for yous. Perchance you've run into some of these scenarios in the past. The kickoff of these techniques is to use this paradigm in a title cake in a cartoon.
 Inserting a moving picture into a SOLIDWORKS championship block.
When working in drawing mode, nosotros can but select INSERT>Picture and add our company logo to the championship block. This works great and is a simple process to follow. When using this method, we occasionally run into bug downstream.
The first issue we run into occurs when we save our drawing equally a DXF or a DWG.
 Saving our drawing to a DXF and finding that the epitome does non translate every bit desired.
Depending on the format of the paradigm, exporting the drawing to DWG or DXF can sometimes yield undesired results. In the image above, we can see that the prototype did not translate through to the DXF, so we were left with an incomplete championship block. (This doesn't ALWAYS happen, merely it is one little affair that tin cause a hiccup).
 A drawing championship block that is missing an paradigm because the linked epitome is no longer present.
Sometimes when we add images to drawings, we choose to use linked images. This tin can exist an elegant solution considering if the source image changes, the title block automatically updates. When the link to these images is broken, or the source files are no longer establish, nosotros can end up with an incomplete title cake because the company logo no longer shows properly, every bit illustrated in the image in a higher place. (Again, this doesn't E'er happen, but information technology is some other niggling thing that tin can crusade a hiccup).
 Decals created in the model practice not show up in a traditional cartoon view.
Side by side let's talk about decals.Decals are an amazing tool in SOLIDWORKS and a keen manner to prove a visitor logo on your parts.But decals won't testify in a traditional cartoon view, as shown in the image above. There may be times when you desire to evidence the manufacturing team exactly where the company logo is supposed to exist located right on the drawing view.
Converting Your Company Logo to SKETCH Geometry
We've now covered a few things that might non work when using a visitor logo in your SOLIDWORKS projects. These tools are all great tools, and they all have their place, but sometimes nosotros want to go the extra mile to ensure that our visitor logo e'er works and that our unabridged manufacturing procedure can use the company logo geometry. In these cases, the best matter to do is to create a new sketch of the visitor logo.
Sizing Up Our Logo
We'll start by creating a brand new model. One time we create this model, we're going to create a unproblematic sketch representing the overall size of our logo. After in this blog we will see how easy it is to resize our logo, in one case we brand it a sketch block. For now we are simply going to cull to make our logo 200mm wide.
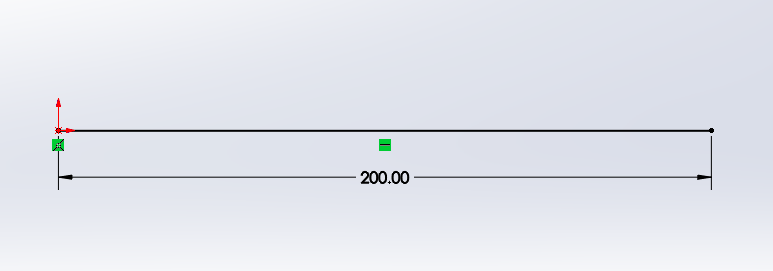 Create a new sketch with a line representing the overall width of your logo sketch.
After creating this we can exit this sketch and brainstorm a second new sketch on same plane. We can utilise the control TOOLS>SKETCH TOOLS>SKETCH Moving picture to insert our visitor logo, every bit shown in the following image.
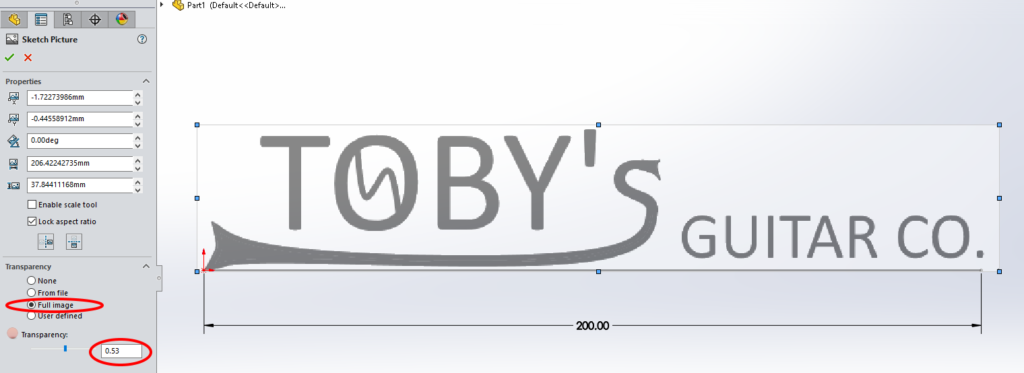 Inserting the company logo and sizing the image based on the previous sketch line.
Afterward inserting this image we tin resize the logo to match the line created in the previous sketch.I also similar to toggle the selection for FULL Image TRANSPARENCY, and set it to most l percent.
Using Splines to Trace Our Visitor Logo
Now the fun function begins—we exit this sketch of the company logo and begin a new sketch. I like to take certain areas of the company logo and recreate them i sketch at a fourth dimension. This helps forestall accidently moving part of the sketch, since we frequently leave parts of the company logo sketch as under defined geometry.
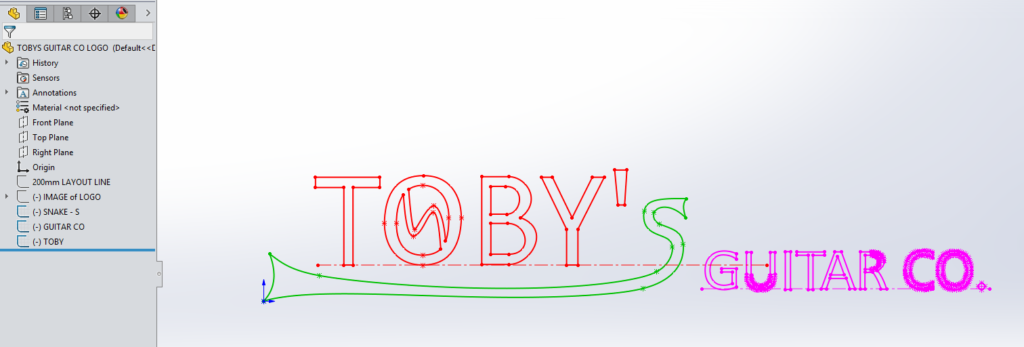
We're going to start with the ophidian shaped "Southward" in the visitor logo. We exit the current sketch and begin a new sketch on the same plane.
 Tracing splines over the logo.
In this new sketch, our goal is to capture and convert the existing logo image into a SOLIDWORKS sketch. This often means working with splines, which nosotros can run into in the image above. We want to attempt to go as close to the original logo every bit possible. Splines are a great tool to apply for shapes that take a lot of curvature. Nosotros are now finished with the offset department of our company logo, so we exit the sketch.
Working with Text from Our Company Logo
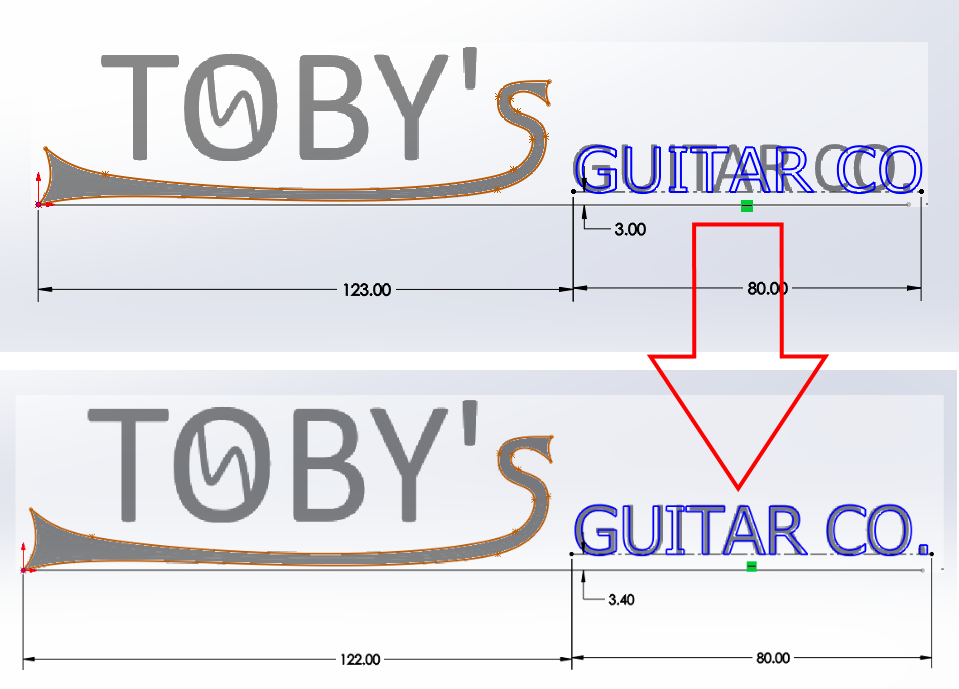
After tracing the curvy element of the logo, I like to brainstorm a new sketch for the adjacent element of the logo.In our case, we are going to adjacent capture the text "GUITAR CO."
 Calculation the text for the next office of our company logo.
In the higher up image we can come across that we start past using the SKETCHED TEXT control. It tin can be very helpful to employ a construction line and dimensions to ascertain the location of the text. This will give us the ability to brand some subtle adjustments to the font size and location, until nosotros go pretty close to a match, as shown in the to a higher place image.
Dissolving Our Sketch Text
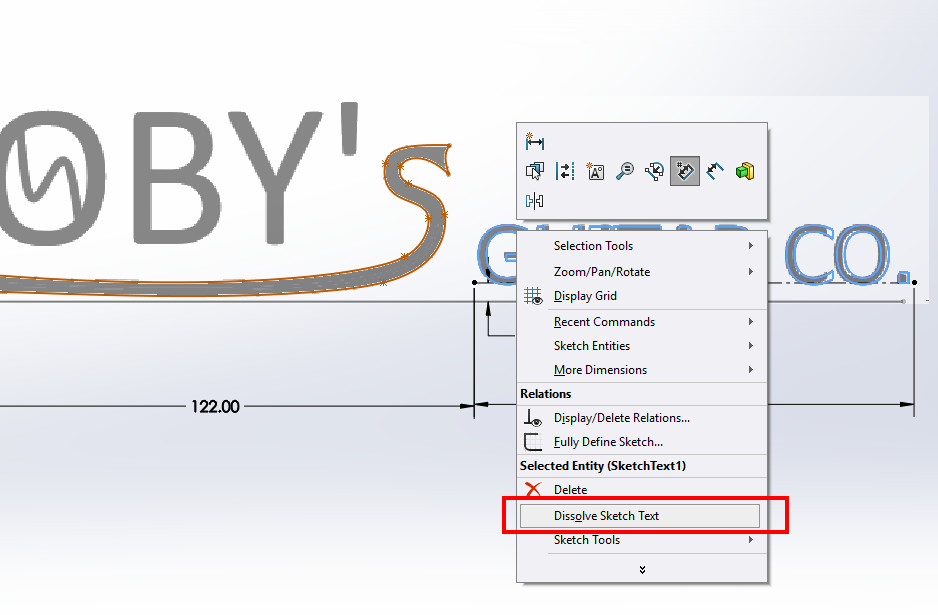
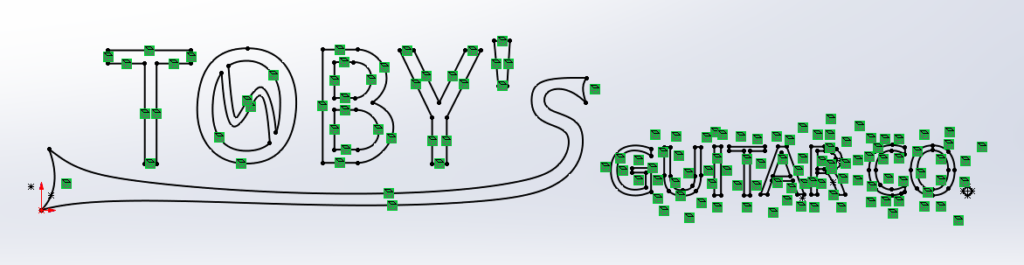
Nosotros now take our sketch text looking pretty close to the original company logo, simply now we need to do some fine-tuning. To accomplish this, we can practice a right mouse button click on the sketch text and cull DISSOLVE SKETCH TEXT, as shown in the following image.
 Using the deliquesce sketch text command.
Using deliquesce sketch text actually helps us with ii areas of this process. Once the text is dissolved, it becomes private lines, arcs and splines. This means we tin can fine-tune the text to match our company logo.
 Dissolving the sketch text then we can make some more adjustments to friction match our logo.
Equally we can see in the in a higher place epitome, after dissolving our sketch text, we can make further adjustments to match our existing company logo. In our case, the text we selected got u.s.a. pretty shut, but we needed to slightly change the geometry of the messages "I" and "R." Nosotros also needed to change some of the spacing of our messages and the period in "CO." from a rectangle to an oval.
Being able to fine-tune our text is a huge benefit of using the dissolve sketch text control. The other advantage of using the dissolve sketch text control is that we can now use this text geometry in downstream operations where sketch text cannot be used. The nigh mutual tool where this will become an outcome is the Convert ENTITIES command in sketch fashion. When we take sketch text in an before sketch, we cannot select this sketched text for a convert entities control. This is a limitation of the software. We can convert sketch text that has been dissolved. This will be very useful when working with company logos.
Converting the Terminal Function of Our Logo
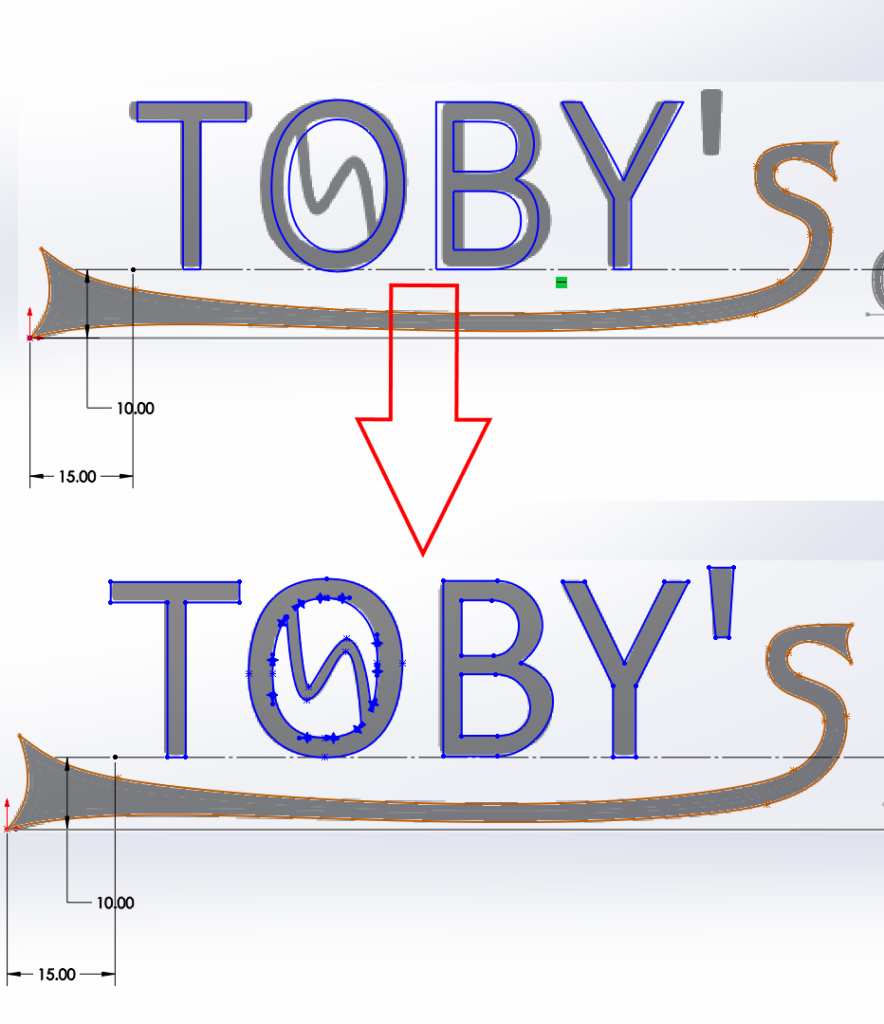
We are now fix to get out the sketch for "GUITAR CO." and create a sketch for "TOBY" with the symbol in the letter of the alphabet "O." Nosotros will follow the aforementioned steps as the previous section. Brainstorm a new sketch, create some sketch text, get it close to our company logo, dissolve the sketch text, go in and make some final changes.
 Converting the text for our first discussion into a sketch and fine-tuning the sketch to match our logo.
In the above prototype we can see that the sketch text was created and positioned and so that information technology is a close match to the original logo. We so dissolved the sketch text and added the final touches to become it to match the original logo more accurately.
Combining the Sketches and Creating a Sketch Block
We now have three sketches representing the different areas of our visitor logo, equally shown in the following image.
 Nosotros accept three unlike sketches and would like to combine these into 1 single sketch.
To become these iii sketches combined into one single sketch, nosotros tin begin a new sketch, choose each of these three sketches(from the tree) and launch the CONVERT ENTITIES control. This will convert each of the 3 previous sketches into the current sketch. As we mentioned earlier, this would not be possible if nosotros hadn't chosen to dissolve our sketch text.
 Using convert entities to combine the 3 previous sketches into one single sketch.
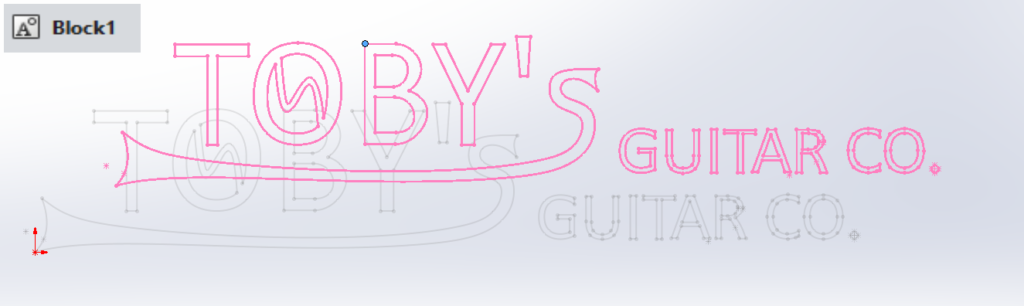
At present that we take our entire visitor logo in one single sketch, we want to exist able to easily apply and reuse this logo. I of the best ways I take found to attain this is to create a sketch block using the command TOOLS>BLOCKS>Brand.
 Our logo has now been turned into a cake.
To turn our logo into the block shown in the above image, we tin exercise a window select and select all of the entities in our sketch (the entire company logo). We can then choose TOOLS>BLOCKS>MAKE. This will accept all of our selected entities and turn them into a sketch block.
Calculation Our Sketch Block to the SOLIDWORKS Library
We don't want to have to ever open up this "logo part" whenever nosotros want to use this sketch block. The next footstep is to add this sketch block to our SOLIDWORKS library.
 Calculation our cake to the design library for easy re-use.
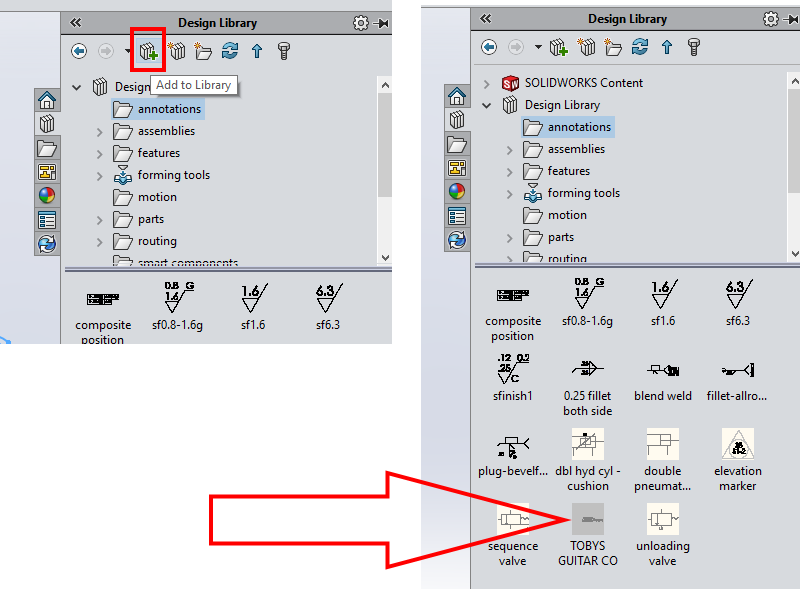
To add together our block to the blueprint library, we can kickoff past selecting our block from the SOLIDWORKS characteristic tree. We can then get into the Chore PANE, the tabs on the correct side of the screen, and cull the DESIGN LIBRARY.Nosotros so choose the folder where we desire to store the block.In the above image, we take chosen the ANNOTATIONS binder. We then choose the icon for Add together TO LIBRARY, and we cease by giving the cake a name.
Adding the Visitor Logo to Our Drawing Championship Block
Now that nosotros have our visitor logo stored as a block in our library, permit's see how like shooting fish in a barrel it is to apply and re-utilise. We can close all of our open files and open our drawing. In the cartoon, we will edit the sheet format and examine the title cake. We want to add together our company logo to the title block, so we aggrandize our design library and so drag and drop our company logo right onto the title cake.
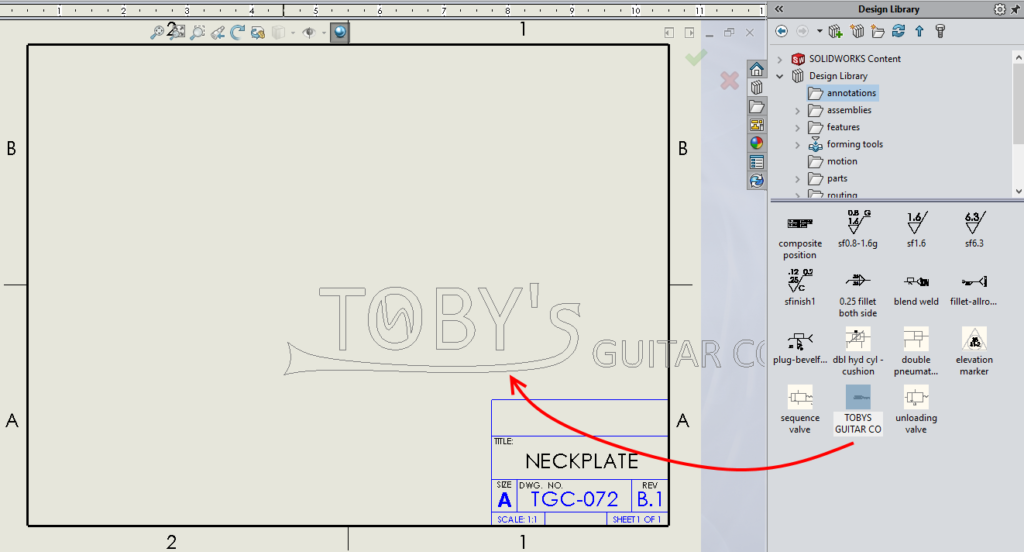 Dragging and dropping our company logo from the design library.
In the above image we can see how easy it is to drag and drib our logo from the design library into the drawing sheet format. But it'due south non the right size. The squeamish thing about blocks is that they are very piece of cake to both move around and resize.
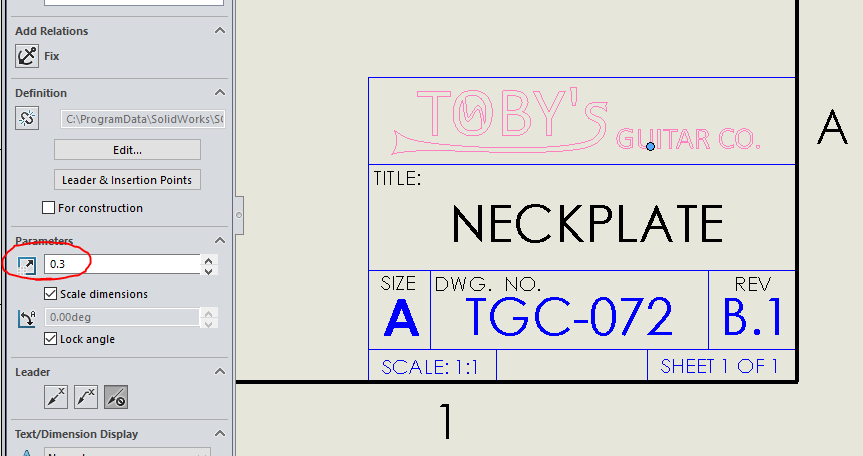 We tin hands alter the calibration and position of the cake.
The logo looks groovy in our title block. Nosotros can add some shading to information technology if we want it solid and, of grade, when we export this to a DXF or DWG, we can be confident that the sketch block will come through to the DXF as expected.
 The company logo created every bit a sketch block is properly translated into the DXF format.
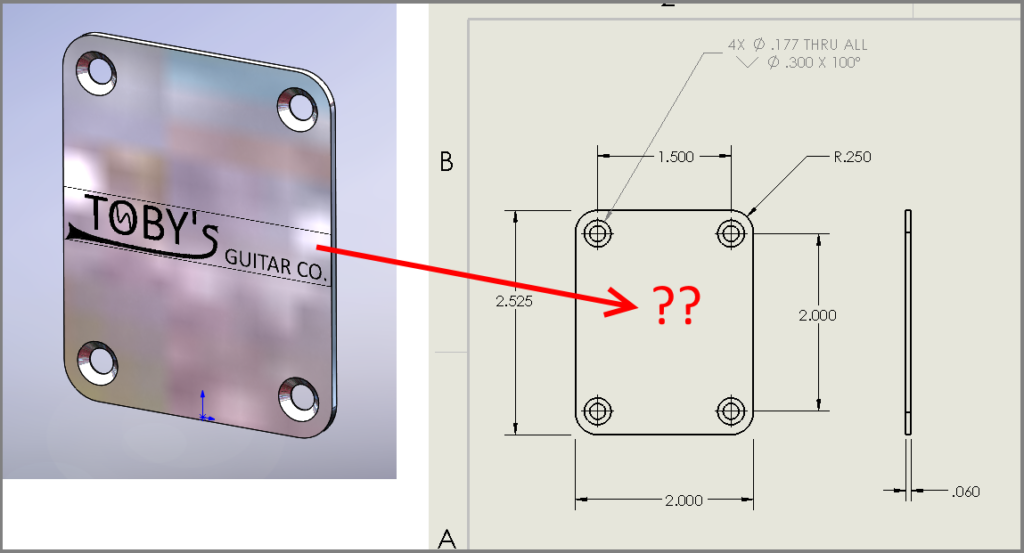
Calculation the Visitor Logo to Our Solid Geometry
The final thing we want to show is that nosotros can follow this same process of dragging and dropping the block from the design library to create a new sketch geometry in a solid model.
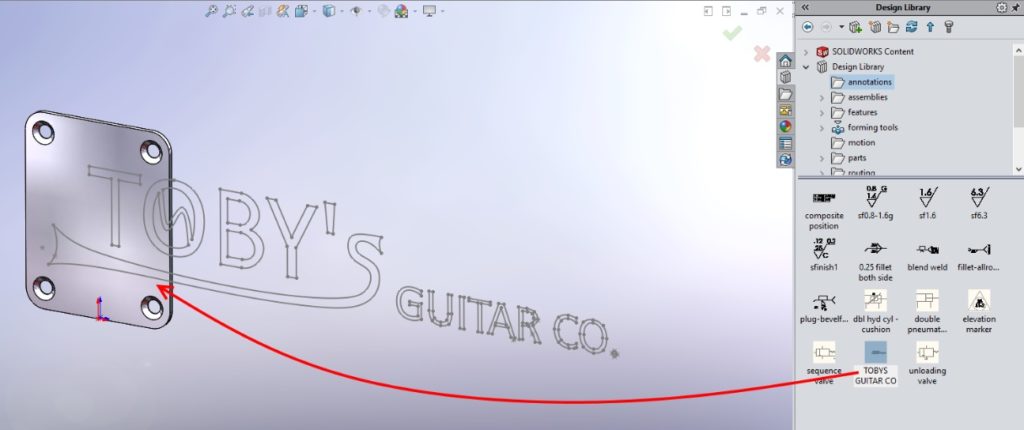 Dragging and dropping our logo from the design library to a SOLIDWORKS 3D model.
In the to a higher place image nosotros can encounter that the procedure starts with us opening the 3D solid model of our neck plate. We then drag and drop our company logo from the SOLIDWORKS design library onto a planar face up of our model.This creates a new 2nd sketch. Our logo is added, as a cake, to this second sketch.
Just like with the cartoon instance, we can scale and reposition our logo to get it into the desired location.
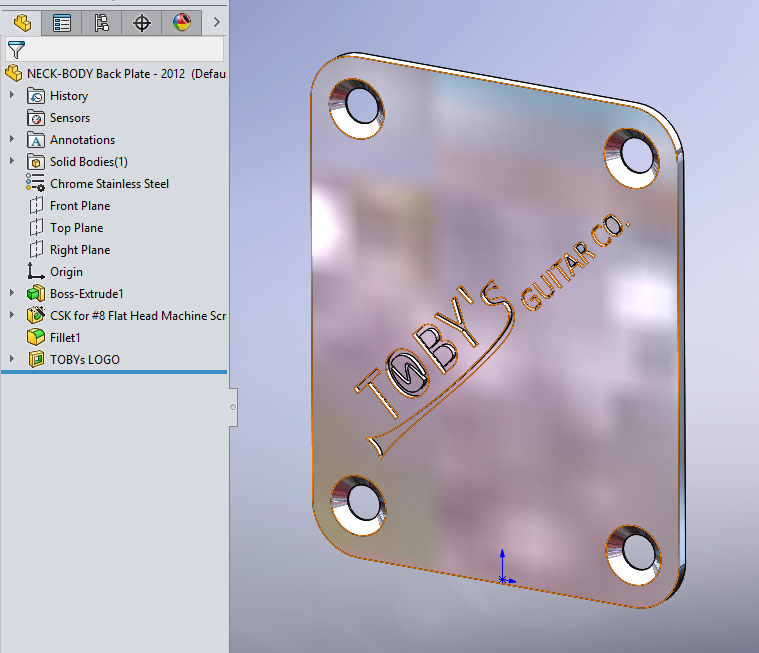 Our visitor logo has been added to the neckplate every bit a cut-extrude feature.
Once we have the logo sized and positioned, we can leap right into a CUT EXTRUDE command, to add our company logo as a 3D characteristic.
This of grade means that the visitor logo will at present display in our cartoon, so we can convey to the manufacturing team where the logo is to exist located.
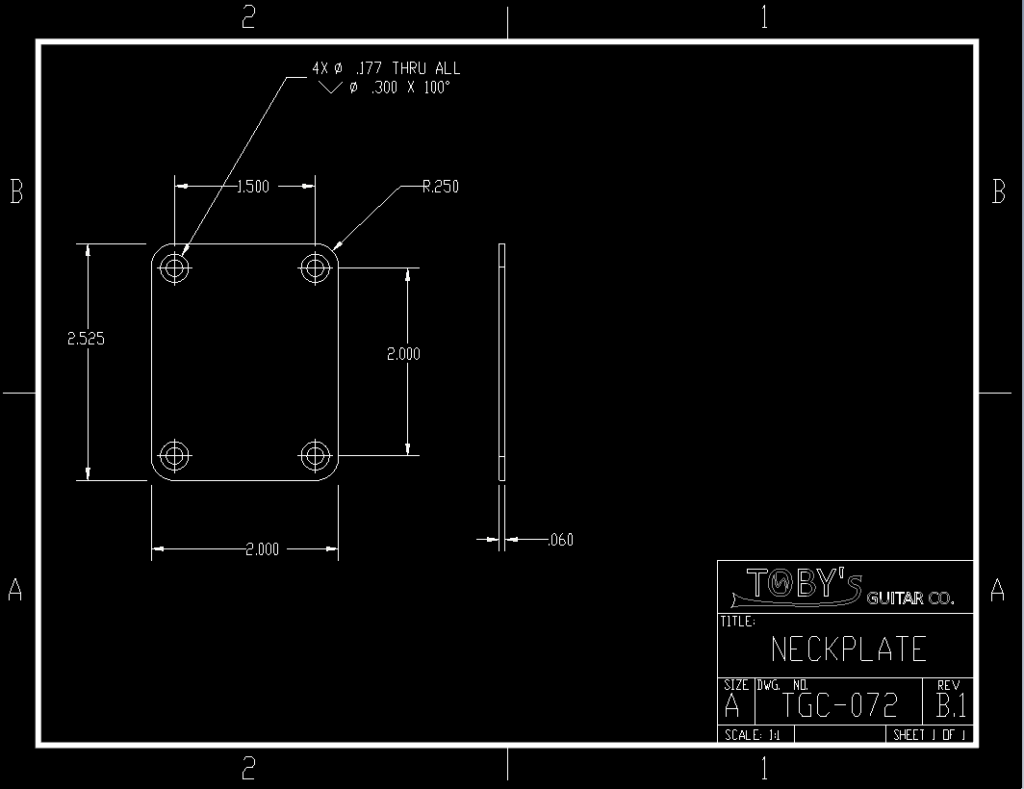
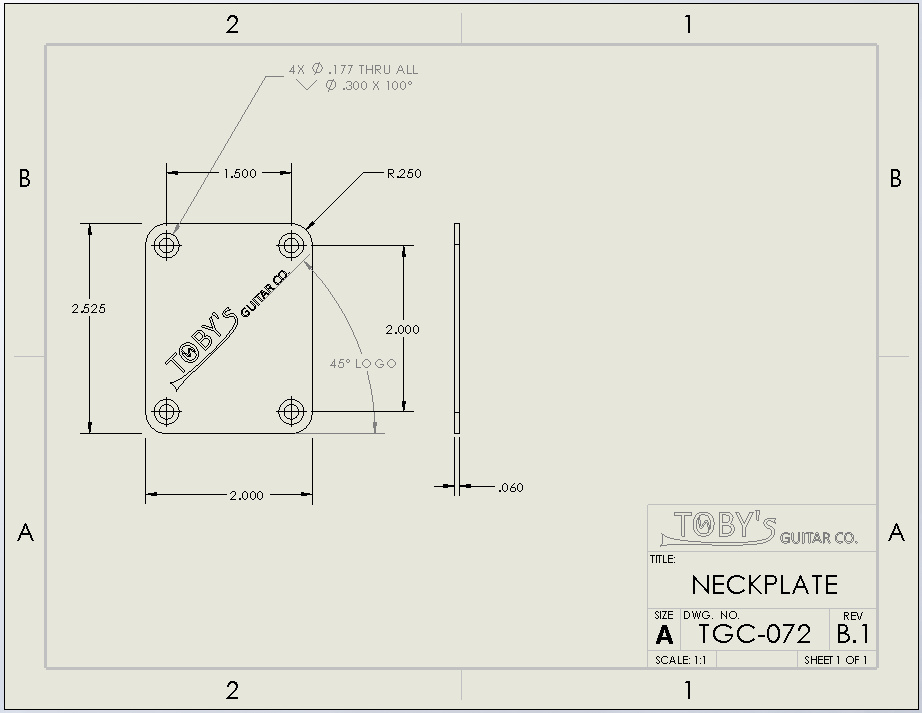 A traditional drawing view now shows the company logo and location on the plate.
Conclusion
When it comes to working with a company logo in SOLIDWORKS, in that location are a number of dissimilar tools we can utilise. We tin add the logo as an paradigm, either in our drawing championship block or in our model as a decal. There are some limitations when nosotros use embedded images in SOLIDWORKS projects.
Instead, nosotros can consider taking a company logo and turning it into a true sketch. This often ways importing the logo as an epitome and taking some time and care to properly recreate the company logo as a SOLIDWORKS sketch. Once we accept the logo converted into a single sketch, nosotros can use the TOOLS>BLOCKS>Brand command to create a sketch block and add this sketch block to our design library. This block tin can then be easily used and re-used on time to come projects. We tin can insert this cake into the championship block of a drawing or use the block equally a sketch geometry in a 3D characteristic on our model.
Most the Author

Toby Schnaars is a Certified SOLIDWORKS Adept from Philadelphia, Pa. He has been working with SOLIDWORKS software since 1998 and has been providing training, technical support, and tips and tricks since 2001.
Source: https://www.engineersrule.com/3788-2/
0 Response to "Uploading More Than One Vector File Into the Same Solidworks Part"
Post a Comment